MULTIPURPOSE TESTER
for LED TV Backlight & Constant Current Driver Board
Product model: TD3H
Vin: AC 85-265V
Vout: DC 0-330V (Automatic + Adjustable)
Voltmeter Accuracy: < (± 0.5 ± l%Vout) V
lout: 0-150mA (Automatic + Adjustable)
Constant Current Board Testing Current: 0-999mA
Ammeter Accuracy: <(±2 ±l%lout) mA
Pinput: 50VA(MAX)
Temperature: -20°C~+40°C
sn300-1.jpg
1). Input Interface of Constant Current Board
2). Power Switch
3). Power Input
4). Banana Jack
5). Voltage and Current Adjustment Knob
6). Current Switch (transfer the current, 1 mA and Adjustment Current)
Product introduction
Real-time testing voltage and current of constant current drive board. 1. Testing LED strips, LED panels, single LED bead, COB lighting sources and so on.
2. Testing backlight of LED TV, displays, computers and so on.
3. Compatible with all the LED strips (high voltage or low voltage).
4. Manual adjusting the range of testing voltage (20-330V/DC) and current (20-150mA).
Adjusting voltage at open circuit (without loads) and adjusting current with loads or contact probes together.
5. No burn out when testing single LED bead with wrong polarity. (Set voltage around to 20V and the current switch to 1mA)
6. Testing voltage parameter of various of electronic components.
7. Testing LED light on vehicle.
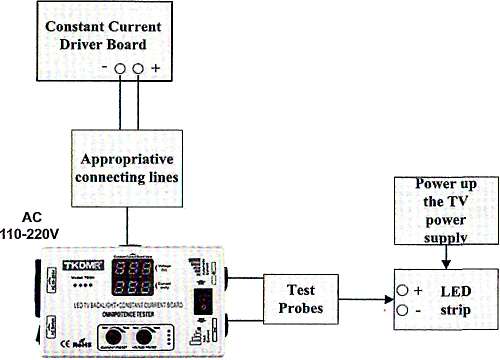
Testing Methods
Default factory setting: Output Voltage 330V, Output Current 30mA. You can testing the backlight of TV with any size at this default settings.
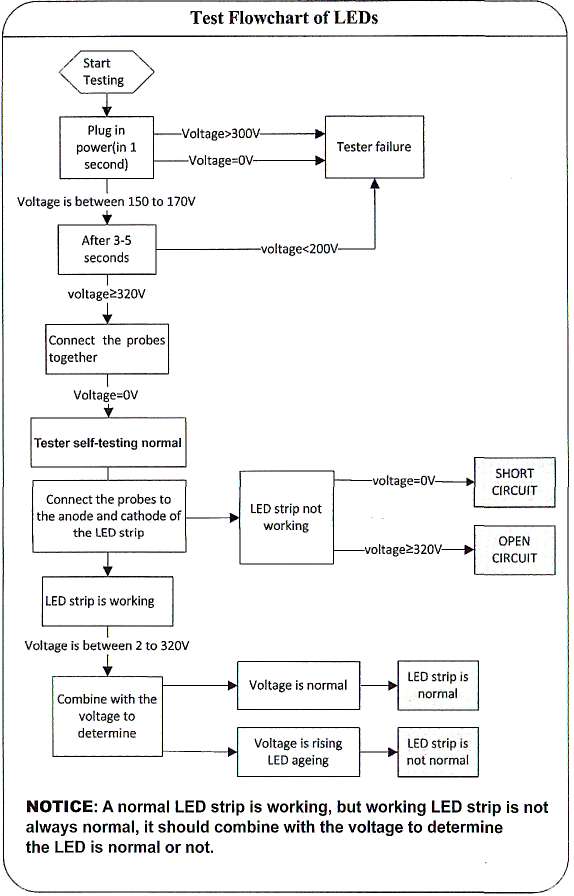
1. Self-testing: Plug in, turn the power switch on. The voltage is around 330V, current is 0; Contact the probes together, voltage changes to 0 and current changes to around 50mA, then testing can be started.
2. In testing:
Voltage = '0', SHORT CIRCUIT. Voltage = '330V', OPEN CIRCUIT.
3. Testing single LED bead (Set voltage around to 20V and the current
A. With right polarity: the voltage shows on the tester of a normal LED bead is about 80% of the rated voltage, for example, the operating voltage of the LED bead is 2.4V if its rated voltage is 3V;
B. With wrong polarity: Voltage display the open circuit voltage.
4. Testing LED strips: Set the voltage to around 200V, change the current if need adjust brightness.
Test method without disassembling the screen
Cut off the power of TV, Unplug the interface sockets of the constant current plate and light bar, Insert the Red and Black pens of the tester into the anode and cathode of the interface of the LED light bar.
1. Multiple LED strips
Testing the voltage of each strips and record them. Compare the voltage of each strips, it is normal if the differences <2V or <3%.
2. Single LED strip
A. The LED strip is not on (need remove the screen to repair): voltage = 0, SHORT CIRCUIT. Voltage > 300V, OPEN CIRCUIT.
B. The LED strip is on (need the testing references of constant current driver board to determine the backlight is normal or not).
Test method of Constant Current Driver Board
Testing situation: the LED strip of backlight is on with the tester, but it does not work with the constant current board;
A.  Cut off the power of TV, unplug the interface sockets of the constant current plate and light bar;
B.  Connect the constant current board with the tester using the cables in the kits on right polarity.
Ñ Insert the Red and Black pens of the tester into the anode and cathode of the interface of the LED light bar
D.  Turn the power of TV on.
E.  Testing voltage >30V, Current >30mA and keep stable, and the LED strip working normal, then the Constant current board is normal.
sn300-2.jpg
Introductions of the additional function
Voltage Test of Electrolytic capacitor:
Connect the black pen with the cathode of the electrolytic capacitor and the red pen with the anode. The voltage value displayed in the voltmeter will rise fast at the beginning. When reaching a certain point, the rising velocity will slow noticeably. At this time the voltage value displayed is the actual withstand voltage of the tested electrolytic capacitor. (The capacitors are qualified if the actual voltage value is higher than the indicated voltage value).
Notice: Avoid to break the capacitor, the testing time should not be too long.
1. Set the voltage around 20V and the current to 1mA when testing the voltage references of diodes, triodes, MOS tube and IÑ.
2. Set the voltage around 330V and the current to 1mA when testing the breakdown voltage of capacitors, stabilivolts, piezoresistors and TVS.
sn300-3.jpg
sn300-4.jpg
Test Flowchart of LEDs
Start Testing
Plug in
power(in 1
second)
Voltage>300V -Voltage=0V-
Tester failure
Voltage is between 150 to 170V
After 3-5 seconds
voltage<200V
voltage£320V
Connect the probes together
Voltage=0V
Tester self-testing normal
SHORT CIRCUIT
voltage=0V
Connect the probes to
the anode and cathode of
the LED strip
LED strip not working
OPEN CIRCUIT
voltagea320V
LED strip is working
Voltage is between 2 to 320V
LED strip is normal
Voltage is normal
Combine with the voltage to determine
Voltage is rising LED ageing
LED strip is not normal
NOTICE: A normal LED strip is working, but working LED strip is not always normal, it should combine with the voltage to determine the LED is normal or not.
WARRANTY
1. This product is guaranteed up to one year from purchase, power cord and probe can be replaced in one month.
2.  If there are some performance problem,simply return it in its original condition within 30 days of receiving it. In the warranty period,we will repair it and ship you a good tester.
3. The warranty period will be extended for three months after we repair the bad product.
4. During the warranty period, freight AA system.
5.  One year later, circuit fault free maintenance, round-trip freight paid by buyer.
6. Please note that the guarantee policy does not apply to (1)Product has man-made damage or accidental damage such as excessive input voltage high temperature, water damage,drop and break,mechanical damage and corrosion.
(2)Unauthorized modification and tearing the product date mark.